Ask the ASIC What Really Happened to Your Packet. ELAM.
Introduction
“The server team says the packet is leaving the host. The firewall team says they never see it. It must be the fabric.”
Endpoint tables look fine, contracts look fine, routes look fine and yet traffic doesn’t flow.
Instead of reasoning about what the fabric should do based on configuration, ELAM lets you ask the ASIC directly: did this packet arrive, and what decision did you make about it?
What ELAM actually is?
ELAM stands for Embedded Logic Analyzer Module.
It is a debugging capability built into the forwarding ASIC of Nexus 9000 switches. You define trigger conditions (source/destination IP, MAC, L4 ports…), arm the capture, and the ASIC snapshots the first packet that matches, together with the complete forwarding decision it made for that packet.
Three things make ELAM uniquely valuable:
1. It is proof of arrival. If ELAM triggers, the packet physically reached that switch. If it never triggers while traffic is flowing, the packet is not arriving and you can stop blaming that leaf.
2. It shows the verdict, not just the packet. The report includes the forwarding result: destination interface, VXLAN encapsulation details, the derived source and destination class (EPG/ESG pcTags), whether policy permitted or denied the packet, and crucially, the drop vector if the ASIC decided to drop it.
3. It is completely non-disruptive. ELAM captures a copy of the lookup result. It does not touch the data path, so you can run it in production without a maintenance window.
Two ways to run it
#1 ELAM Assistant
The easy way.
ELAM Assistant is a free app from the Cisco DC App Center that you install on the APIC. From 6.1.x release the app is in the APIC by default. You pick the nodes, define the trigger in a GUI, and it arms ELAM on all selected switches at once. When a packet hits, it decodes the raw ASIC report into human readable output: source and destination EPG names, VRF and BD resolved from VNIDs, contract result, and the drop reason.
For day to day troubleshooting this is what you want, it makes your life easier.
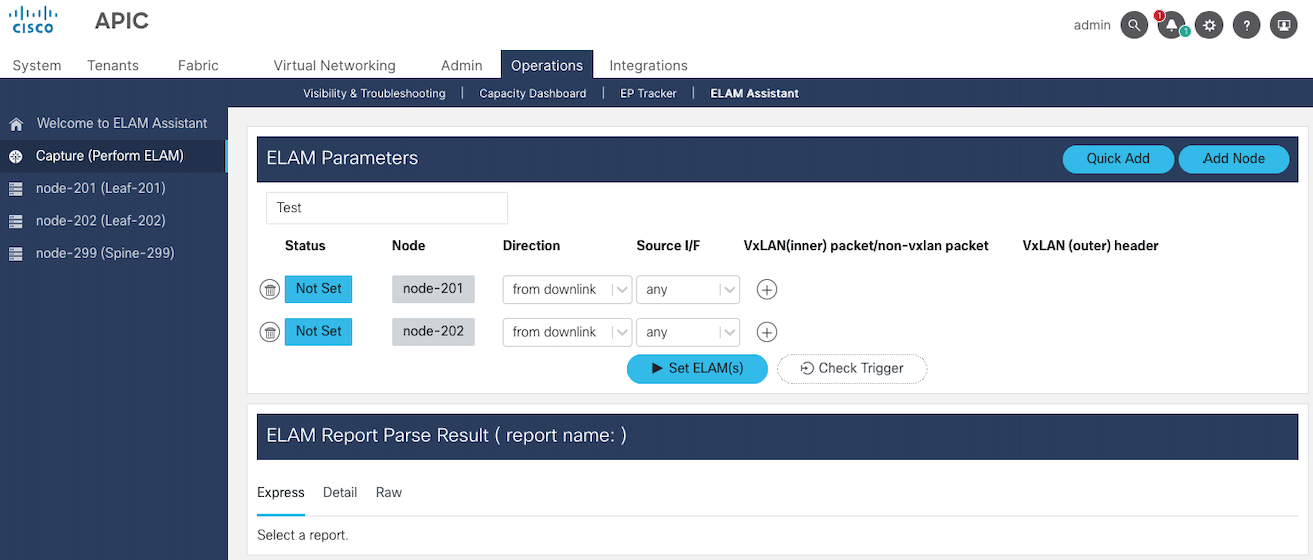
ELAM Assistant APP
Select your ACI nodes, where you expect traffic. If a host is VPC connected to Leaves 201 & 202, select those two.
When setting up an ELAM capture, one of the key parameters you specify is the Direction, which tells the switch which side to watch for the packet and what encapsulation to expect on it. On a leaf switch, you can choose from three options: from downlink, from downlink (VxLAN), or from fabric link.
From downlink, the packet is entering the leaf from a downlink port connected to an external device (a server, firewall, router, etc.). No VXLAN encapsulation is expected; ELAM matches the packet's native headers as it arrives from the host facing side.
From downlink (VxLAN), the packet is also entering from a downlink port, but it's already VXLAN-encapsulated when it arrives (for example, from a VXLAN capable host or another VTEP hanging off that downlink). Because the outer header is present, you can additionally filter on VXLAN parameters like VNID and destination VTEP IP.
From fabric link, the packet is arriving from another ACI switch within the same fabric (leaf-to-spine or spine-to-leaf link). Since ACI always encapsulates intra fabric traffic in VXLAN, packets captured on a fabric link are inherently VXLAN encapsulated, so the same outer header VXLAN parameters (VNID, VTEP addresses) are available for filtering here too.
In short: downlink = traffic from outside the fabric (host side), fabric link = traffic from inside the fabric (switch to switch), and the "(VxLAN)" variant on downlink exists because host facing traffic can occasionally already be VXLAN-wrapped before it even reaches the fabric.
ELAM capture isn't limited to leaf switches, it also works on spines, though the direction options look a bit different there since a packet transiting a spine is always VXLAN encapsulated no matter which way it's moving.
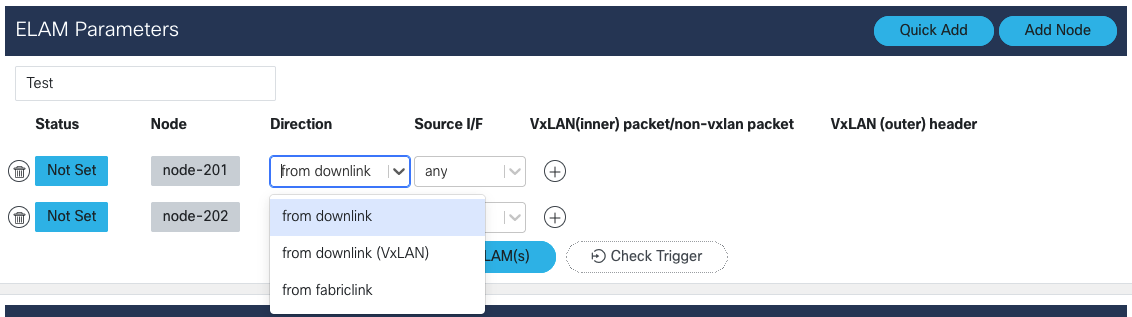
Direction of the capture
You can pick multiple fields from this list to build a precise match on the packet you're trying to capture.
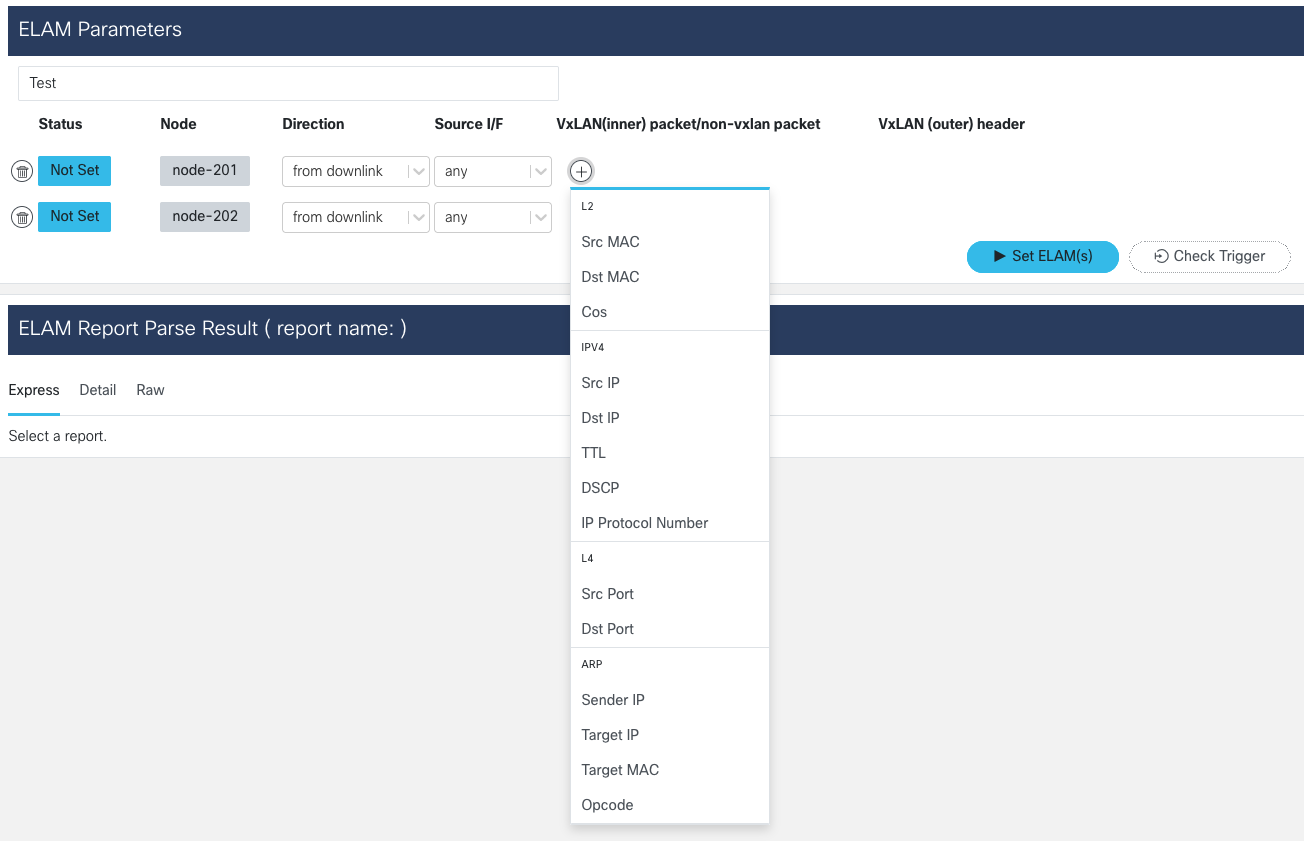
Parameters to match
The capture is ready! “Check Trigger”, to capture your packet!
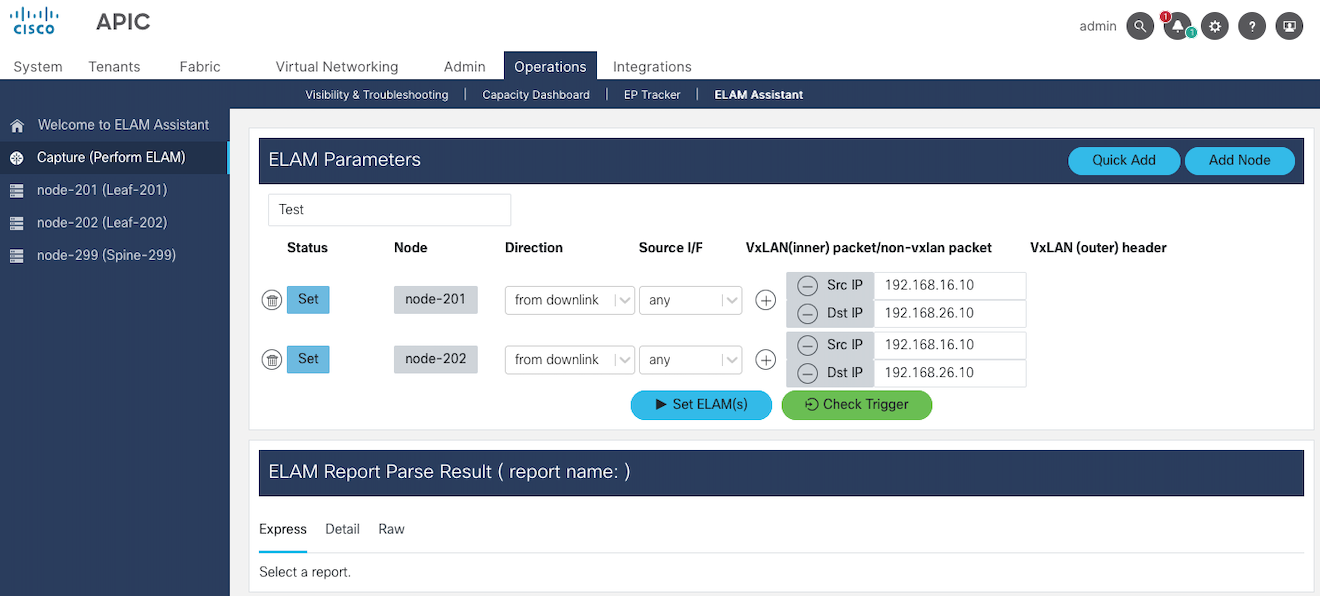
Check Trigger
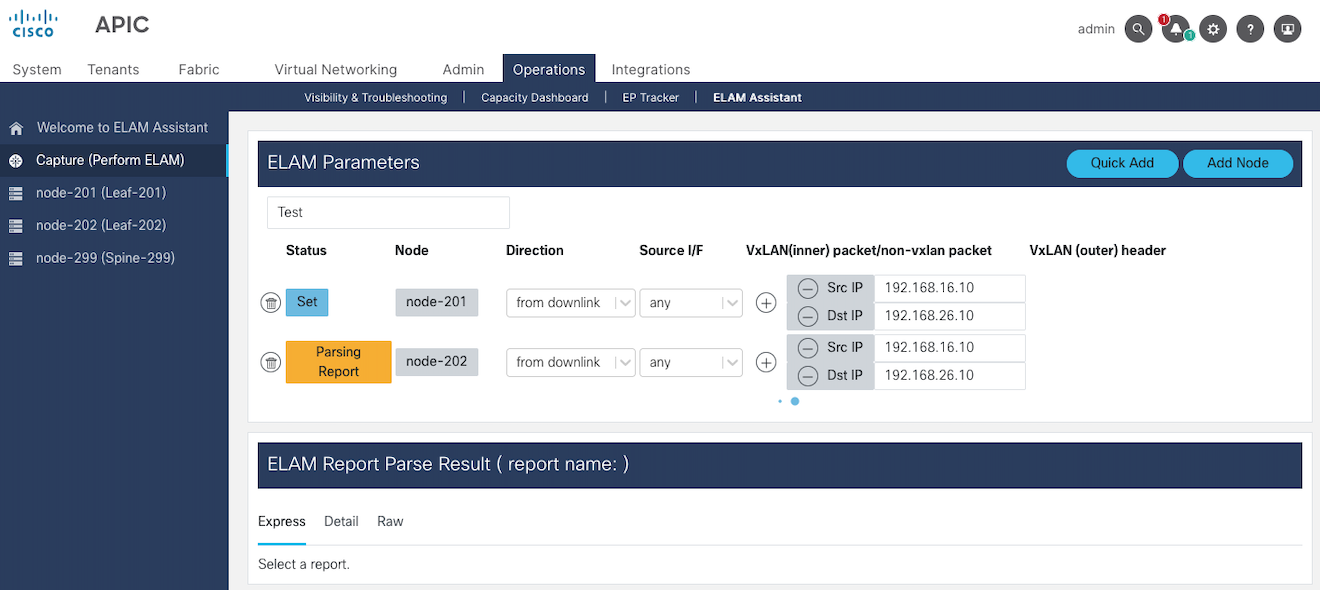
Parsing Report
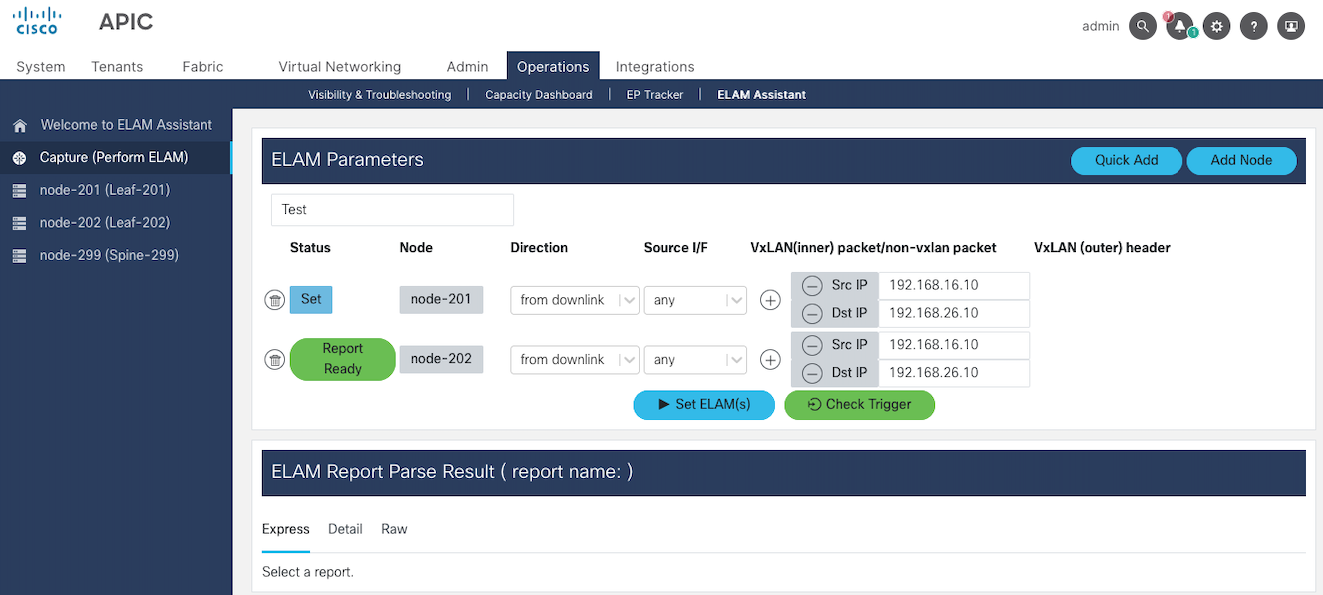
Report Ready
Captured Packet Information
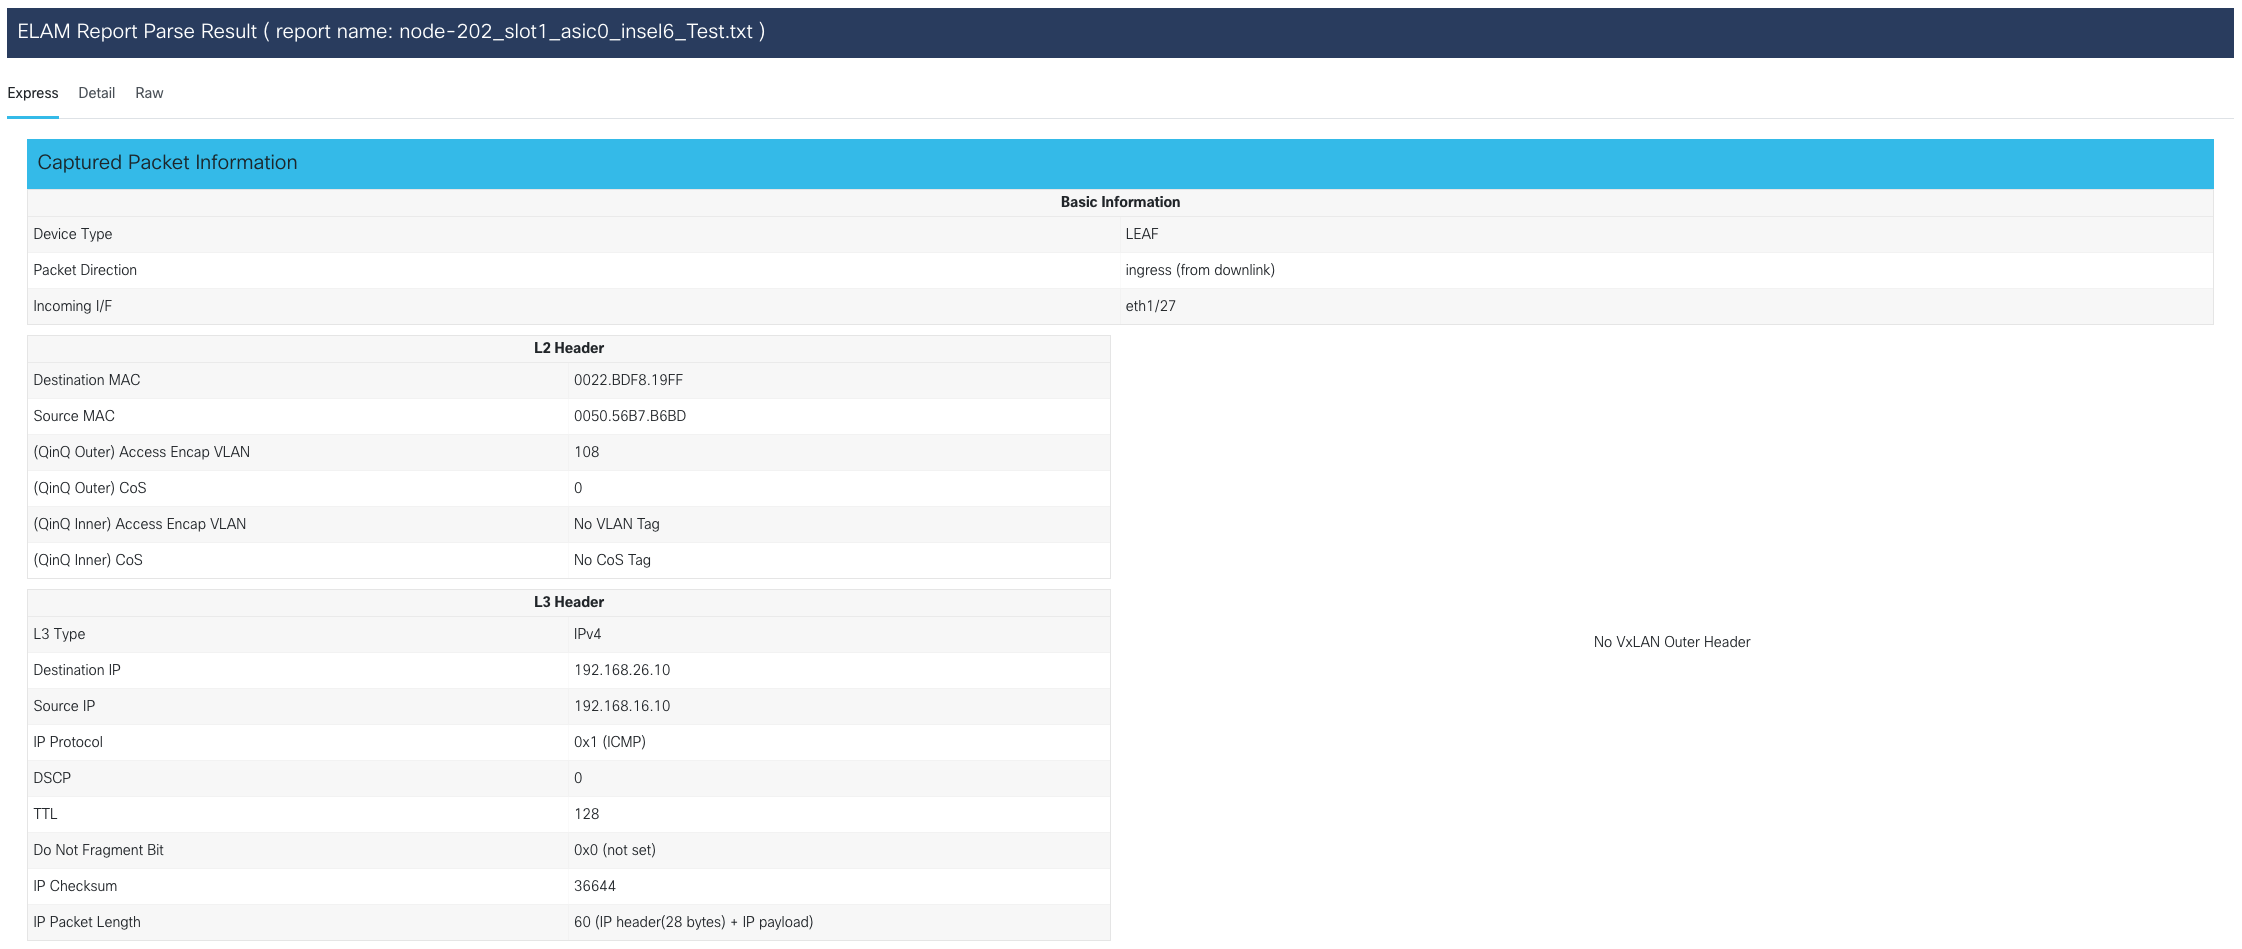
Basic Information
Packet Forwarding Information
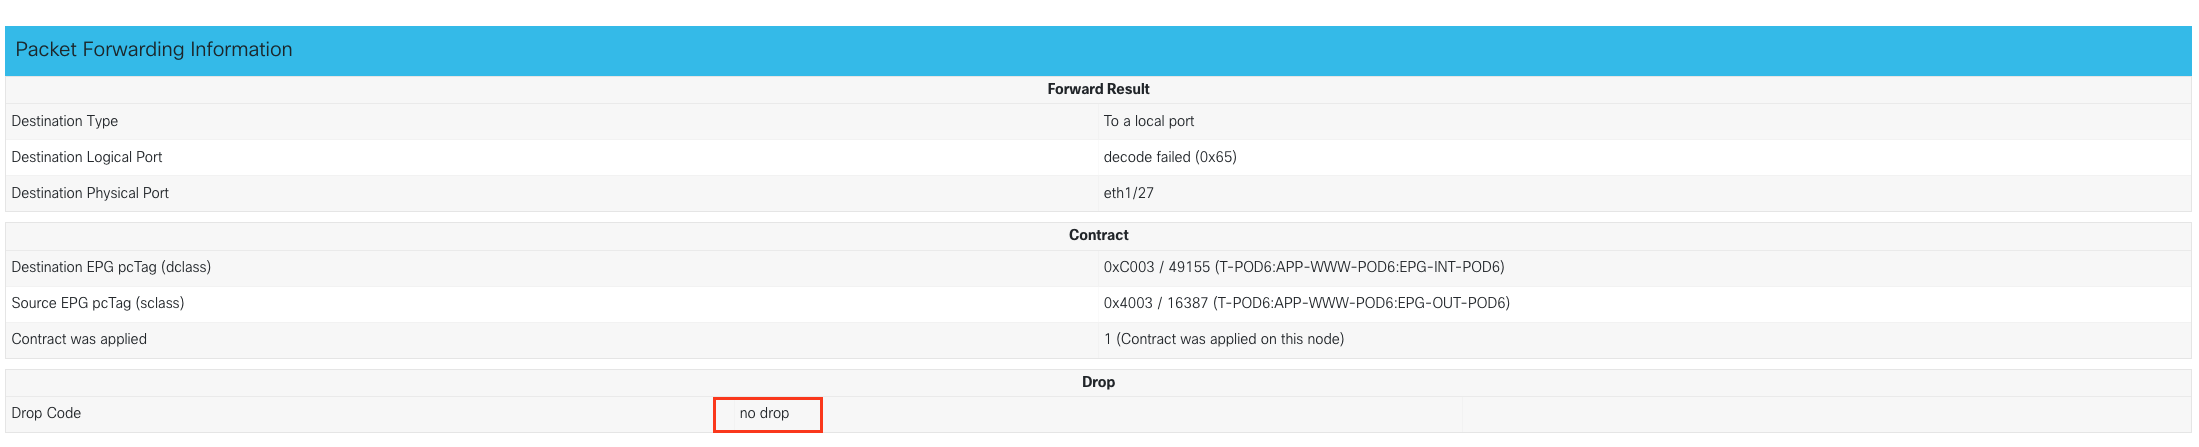
Forwarding Decision
The ELAM capture provides much more details about the captured packet. Not show here for the simplicity.
#2 CLI
“The Cisco TAC way”.
The APP will not always (talking from my experience) be available and when you are on a troubleshooting call at 2 a.m., knowing the CLI flow makes your life much easier.
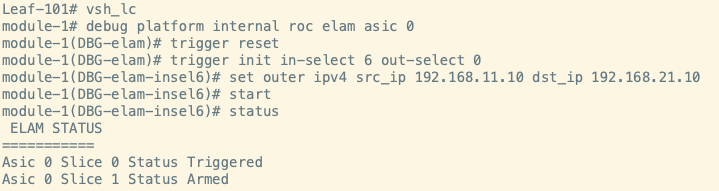
CLI ELAM Capture
Status shows Armed while waiting and Triggered once a matching packet has been captured.

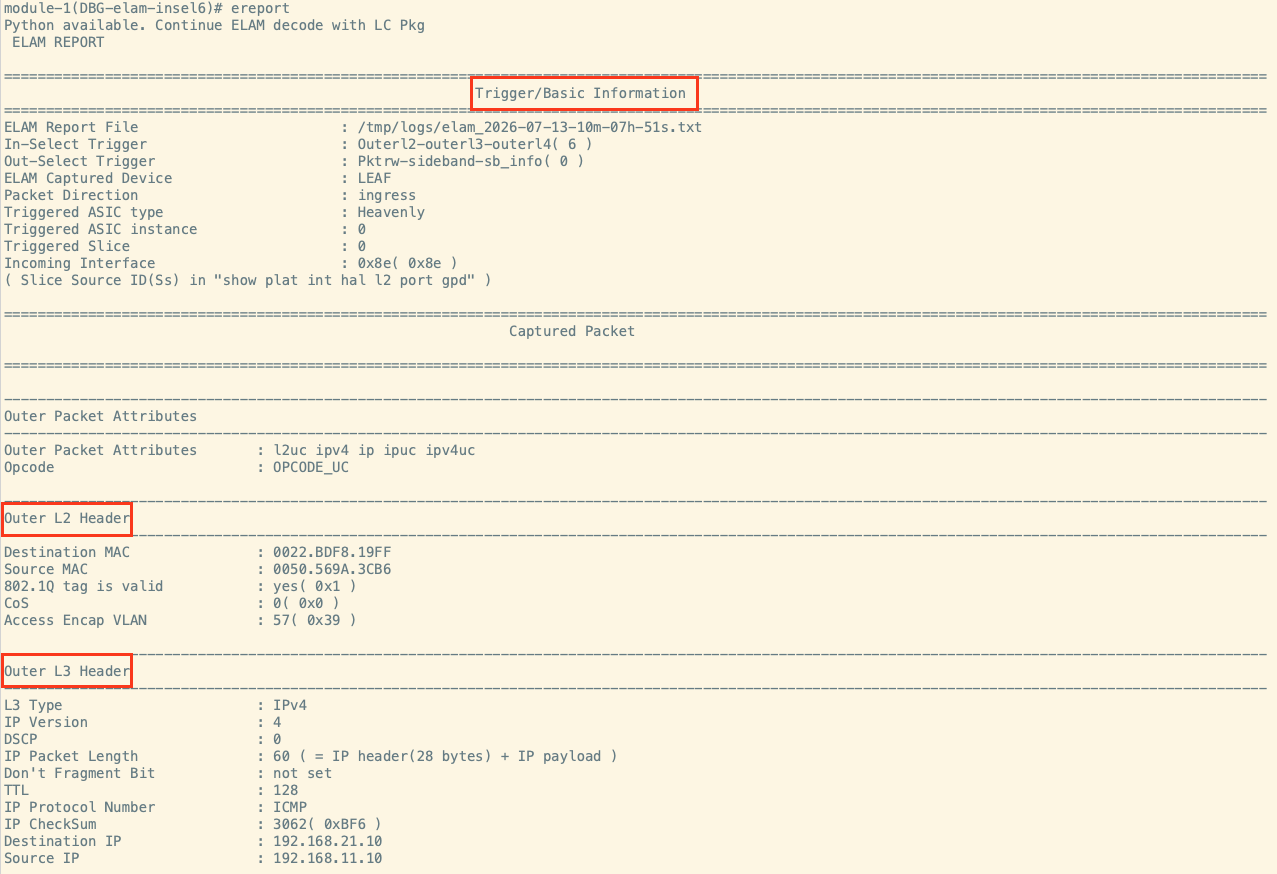
ereport (“easy report”) produces a pre-decoded, readable summary.
ereport
Trigger/Basic Information, Outer L2 Header, Outer L3 Header
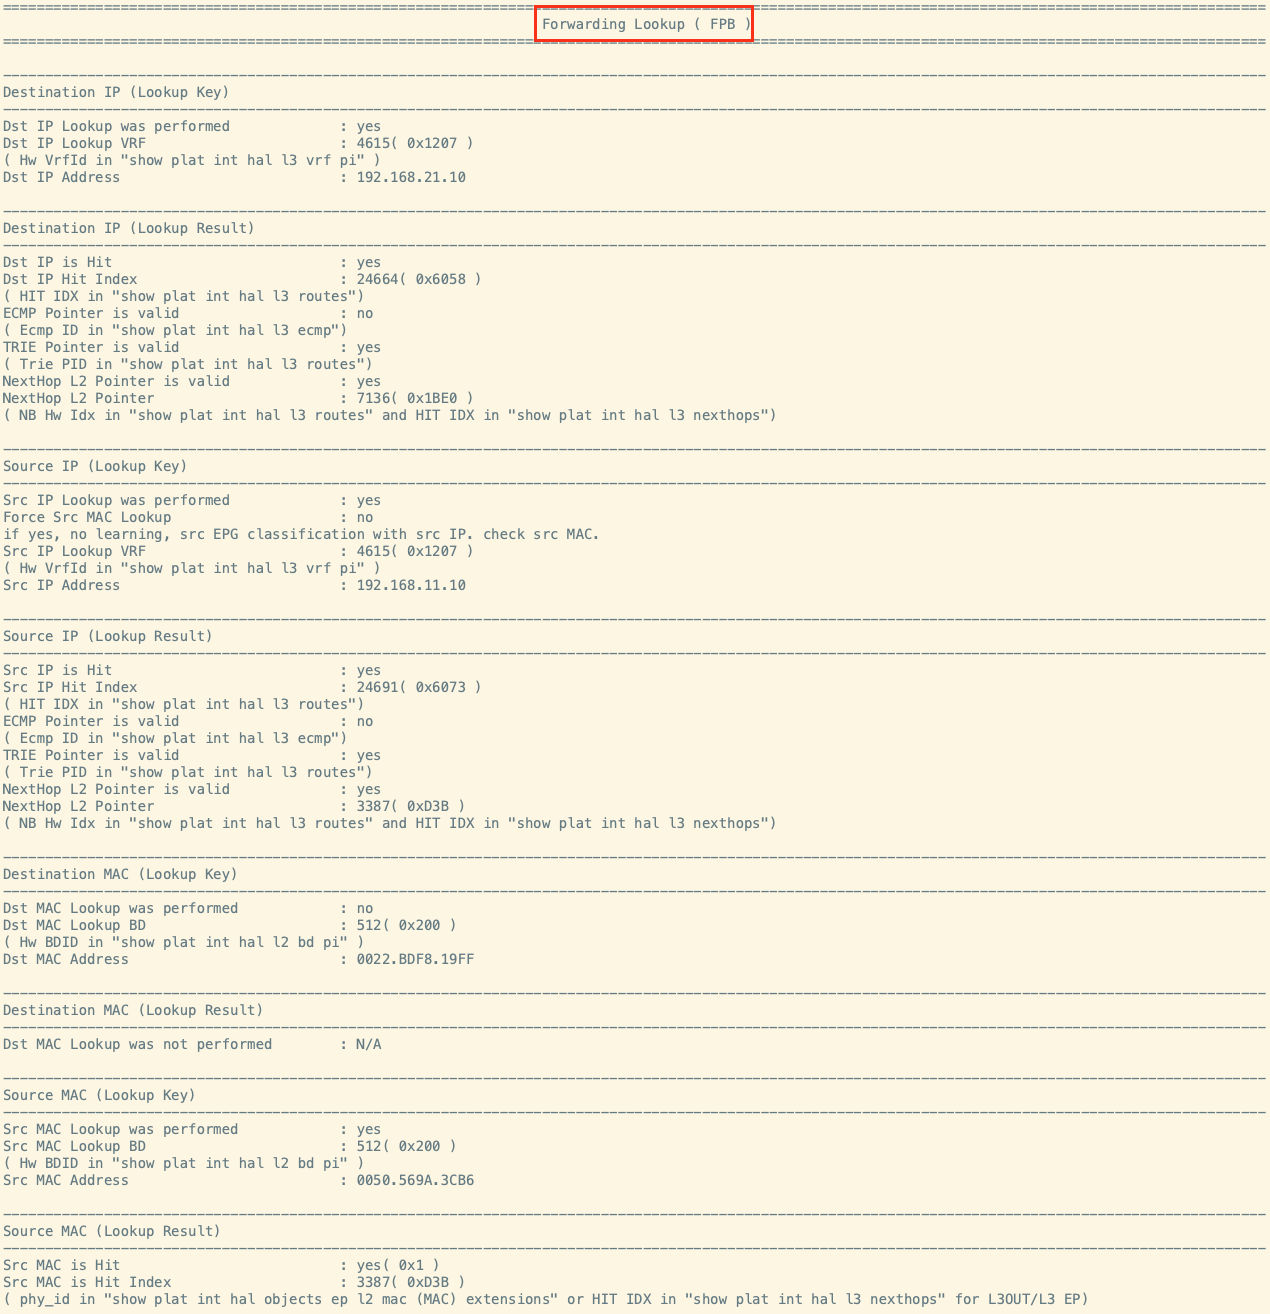
Forwarding Lookup
Contract Lookup
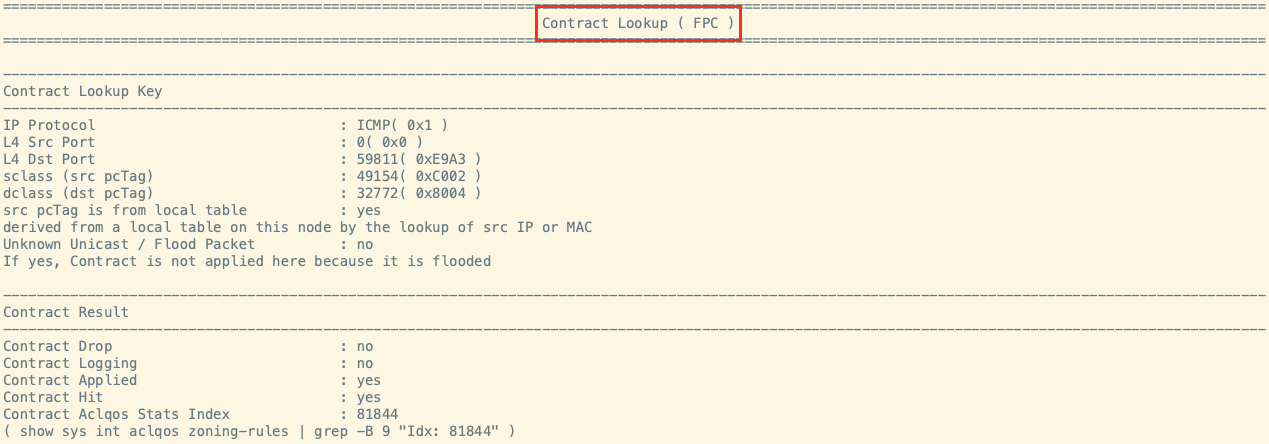
ELAM provides significantly more data than what is shown here. The final section is the “Final Forwarding Lookup”.

How to build your ELAM Capture?
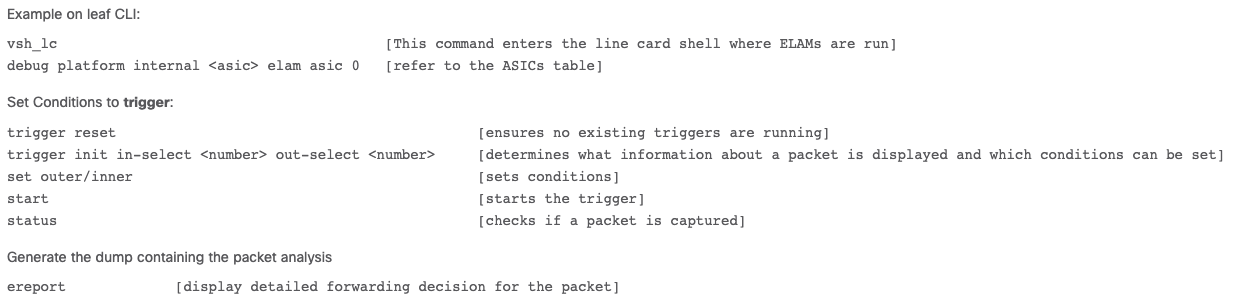
Source: Cisco
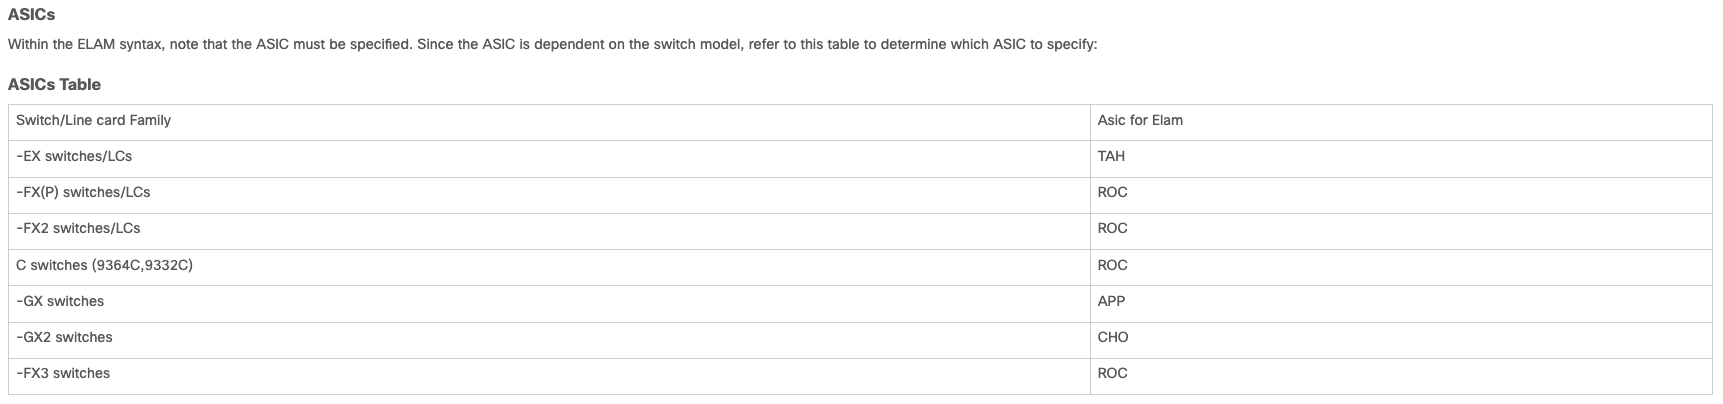
Source: Cisco
The in-select value tells the ASIC which headers to match on, and it depends on which direction the packet is coming from:
• in-select 6 — match on the outer headers. Use this for traffic arriving on downlink (front-panel) ports from a host, where the packet is plain Ethernet/IP.
• in-select 14 — match on outer and inner headers. Use this for traffic arriving on fabric uplinks, where the original packet is encapsulated in VXLAN. Here you typically trigger on the inner headers (set inner ipv4 ...), because the outer header is just TEP-to-TEP.
This is the classic ELAM mistake: arming in-select 6 with the host IPs on the egress leaf and concluding “the packet never arrived”, when in reality it arrived just fine, wrapped in VXLAN, and your trigger was looking at the wrong header layer.
out-select 0 is the common choice for the result format and includes the drop vector information you need.
More details about the ELAM can be found in the official Cisco document:
Reading the report
The fields to look at first, in order:
• Did it trigger at all? Arrival proof. If yes, note the ingress interface, it should match where you expect the host or upstream device to be connected.
• VNID / VRF / BD. Confirms which context the lookup happened in. A packet landing in the wrong VRF explains a lot.
• sclass and dclass. The pcTags of the derived source and destination EPG/ESG. If sclass resolves to an unexpected group or to a reserved value, your problem is classification, not contracts. No contract debugging will help if the packet is classified into the wrong group in the first place.
• Policy result. Whether the zoning-rule lookup permitted, denied, or redirected the packet. Cross reference with show zoning-rule on the same leaf to find the exact rule that was hit.
• Drop vector. If the packet was dropped, this tells you why. See the reference table below. This single field converts hours of speculation into a concrete answer.
• Forwarding result. Destination port, or destination TEP for fabric bound traffic. For PBR service graphs, this is where you verify that the redirect actually happened: the destination should be the service node’s PBR destination, not the original path towards dclass. ELAM is the definitive way to prove “yes, the fabric really did redirect this flow to the firewall” or to catch a redirect rule matching traffic you never intended it to touch (ARP hitting an any-filter redirect, anyone?).
Common drop vectors. Quick reference.
When the report shows a drop, the drop vector name is your starting point. This table is a simplified cheat sheet of the vectors you are most likely to meet in an ACI fabric (based on Cisco’s ELAM drop vector reference material):
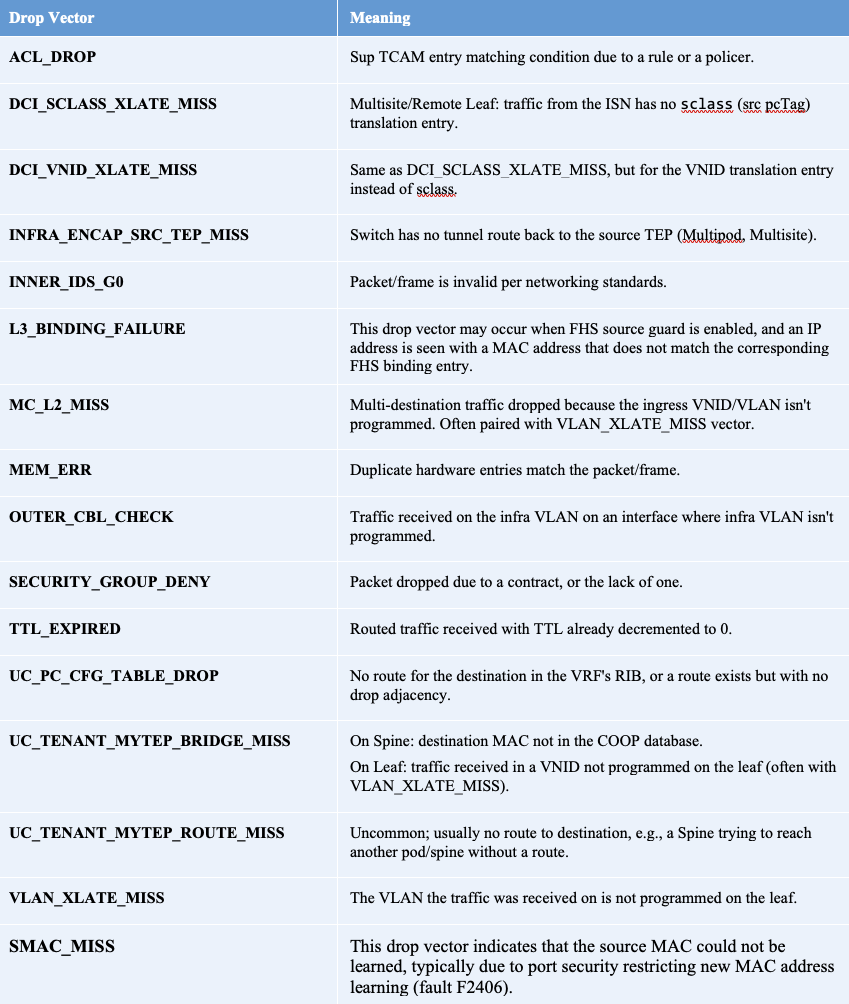
Credit: Matthew Rich